
Additive manufacturing, also known as 3D printing, is generating significant disruption in the manufacturing industry. It’s easy to understand why. The methods used in additive manufacturing are significantly cheaper and less time consuming than traditional manufacturing. In a recent interview with 3D Printing Industry, an online journal, Daan Kersten, CEO of Additive Industries located in Eindhoven, Netherlands, spoke about a couple of important trends in additive manufacturing:
“We see a shift to lower complexity parts and higher volumes, driven by a reduced total cost (we generally see a total cost reduction of 40 to 50 percent). Although this is an important step in the right direction, we are convinced we can further substantially reduce the cost in the coming years. Our goal is to be able to compete with casting.”
If you’re a manufacturer, that last line might have you shaking in your boots. Certainly, we’re not at that point - yet. But the timeline for change is shrinking. It will not be long before Kersten’s comment is a reality.
In the meantime, let’s take a look at additive manufacturing as it stands today and how it can help you get to market more quickly and perhaps cost a little less. To learn more about the future of additive manufacturing, check out this article from our friends at Software Connect.
It’s always useful to know what we’re talking about, define the terms we’re using. Here’s a brief glossary of terms and acronyms tossed about in discussions of 3D printing.
Additive Manufacturing - manufacturing in which material is added rather than cut away. 3D printing is a type of additive manufacturing, and it saves a tremendous amount of money (you don’t have to invest in tooling a part) and time.
STL files - Standard Tessellation/Triangulation Language files are the computer files that give directions to the 3D printer.
FDM - Fused Deposition Modeling (FDM) is typically used for rapid prototyping, though it is also used for pre-production runs (to get samples for the customer) or low volume production runs if you want to do some market research or testing. The printer follows directions from STL files, extruding heated material and building up layer after layer onto a platform.
SLA - Stereolithography Apparatus (SLA) is used when you need your part or product to have a near-finished look. The piece is created when a laser cuts through a vat of liquid plastic as the platform slowly moves down. The plastic hardens quickly. Once the piece is made, it is cured under ultra violet light. The result is a smooth finish, especially compared to pieces made by FDM.
SLS - Selective Laser Sintering (SLS) also uses a laser to fuse and harden fine powdered material like glass, metal or plastic. The finished product is relatively smooth and lightweight. It’s good for creating parts for molds or testing, prototyping and low volume production runs.
Okay, now that you know what all the acronyms mean, let's try to answer the question: which type of 3D printing should I use? To know the answer to that question you need to know: What is the purpose of the part?
Are you just checking out the design or are you going to do testing? Higher resolution has its benefits — the part looks more ‘finished.’ For example, if you're taking samples to a trade show, you might want to use SLA since the finish on the part is practically perfect. Higher resolution also has its drawbacks. It will take longer to print, and it could be more expensive.
Resolution goes back to how a 3D printer works. They move quickly, but can’t change directions quickly. The more points to your design - the higher the resolution - the more direction changes are required. And that takes time.
Think about it this way: If you’re making a square, the directions changes are simple - point A, to B, to C, to D. But if you’re making a circle? That’s going to require many more connections.
You can see what I’m talking about in this illustration from Solidworks:
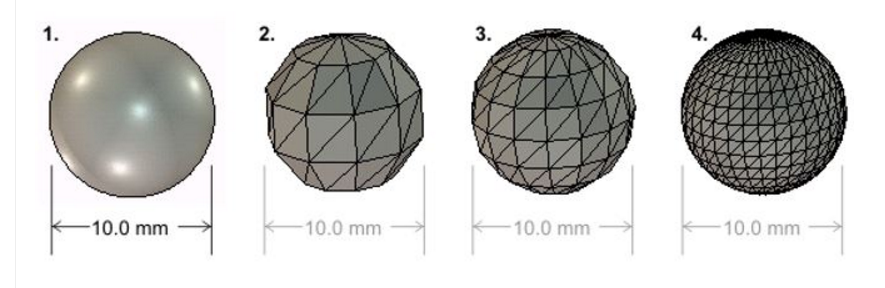
Photo courtesy of Solidworks
You can make a circle that looks sort of round, but it will be rough and you’ll see the faceted edges that make up the points. If you nudge the resolution in the software a little higher (you put more points in the design software telling the printer what to do), it’s going to make a smoother finish, but the time it takes to produce is substantially longer. The plus side is that it’s closer to the design intent.
All printers come with default settings, coarse and fine. They also come with a custom option. To have more control over resolution variables, to print the model you need, choose the custom option. One of our engineers told us that the only way to get to true design intent is by playing with the resolution, but it will affect run time. He suggests taking the extra step of determining the resolution that best suits your intent. It’s a simple way to potentially save money and time during the prototyping process.
We recommend clicking on the links to our previous posts about each type of 3D printing (see below) you might want to use. These posts go into a bit more depth, discuss the materials used and will give you more information about the pros and cons of each method. Talk to your contract manufacturer's engineering support team to find out what type of 3D printing they think is best for your part's application.
Read more:
- What is SLA and When Should You Use It?
- What is SLS and When Should You Use It?
- What is FDM and When Should You Use It?


.jpg?width=176&height=56&name=MR_associatedNetwork_logo%20(1).jpg)